828-683-5400

171 Weaverville Rd, Asheville, nc 28804
contact us

Having issues? We're here for you!

Step 1: press and hold the "clock" button (or "set" button on older models) until the 'hour' number blinks. You may have to press the clock button twice (holding it down on the second press) on backlight models.
Step 2: Use the up and down buttons to change the hour. make sure display shows the correct 'am' or 'pm.' Older models will display a triangle pointing to 'pm' or no triangle for 'am.'
Step 3: To set the minutes, press the "clock" button (or "set" button on older models) until the 'minute' number blinks. Use the up and down buttons to change the minutes.
Step 4: press the "clock" button (or "set" button on older models) again to save the setting. that's it!
It is very important for the time on the display to be correct in order for the valve to regenerate at the right time. please check periodically, especially if a storm or power outage has occured. The computer has a battery back-up in case of power outages but, depending on the outage, the time can be thrown off.
If the time is off a substantial amount, the valve may be regenerating during hours of water use. If this happens, it is not an emergency, but contaminants can potentially make it past the filtration, and therefore contaminate the plumbing and fixtures.

Step 1: Locate the bypass red knobs located behind the mechanical valve.
Step 2: turn the two red knobs 90° pointing toward each other. See "bypass operation" diagram above.
Step 3: To return to service (normal operation), turn knobs back to parallel.
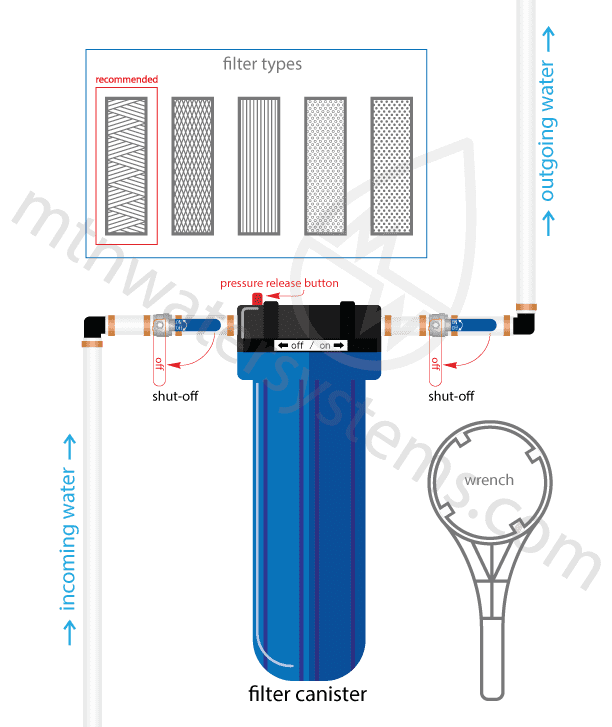
Step 1: Place a bucket under the canister to catch extra water and/or spills.
Step 2: Turn the 2 shut-off valves into the "off" position. They should only turn one way, 90°.
Step 3: Press the red button on the top of the filter lid to release the pressure. you may have to press it multiple times to fully release pressure.
Step 4: Use the filter wrench to loosen the canister.
← off / on →
Step 5: Remove old filter and rinse out canister, if need be. Do not lose the 0-ring.

Step 6: Remove and discard plastic wrap from new filter and insert new filter into canister. please be sure that the rubber o-ring is lubricated with food safe silicone grease and that it's correctly seated and not kinked. do not use petroleum-based grease (ie:Vaseline or Aquaphor), which degrades the o-ring, causing failures.
Step 7: Screw the canister back onto the lid that's mounted to the wall. **Hand tighten ONLY**
attention - important notice:
The standard tightening for in-line filters is hand-tighten only. If the canisters are over tightened, it may cause damage to the canister, threads, and/or o-ring. Also, you may not be able to get the canister loosened again to change the filter.
Step 8: Slowly turn the inlet valve (90°) to the "on" position (open incoming supply slowly to allow the canister to fill with water, to check for leaks).
Step 9: Turn the outlet valve (90°) to the "on" position. That's it!
**Must be a tri-metal anode rod (tin, aluminum, and zinc) or electric anode rod**
Step 1: Turn off power to water heater.
Step 2: Turn off incoming water to water heater.
Step 3: Drain at least 5 gallons of water (attach hose to valve at the bottom and run somewhere to drain).
Step 4: Remove old anode rod (may be hard to remove - may need impact wrench to remove).
Step 5: Add a minimum of 3 quarts (96 oz) of Hydrogen peroxide (3%) into existing water in tank (Can be purchased at Dollar General).
Step 6: Put in new tri-metal anode rod (if rod is too long for tank, just cut it down to needed length).
Step 7: Slowly turn valve on for incoming water and fill the water heater.
Step 8: When tank is full, draw water to every hot water fixture (This will bring the peroxide through the plumbing to sanitize it).
Step 9: Let the peroxide sit for 2-3 hours (DO NOT use any water during this time).
Step 10: Flush the hot water - turn on hot water and let it run until it’s clear.
Other options for smelly sulfur odors in water are:
∙ Instant water heater, which has NO anode rods.
∙ Have a sulfur filter installed.
∙ Ozone treatment.
If the odor returns to the hot water
After the above procedure is completed, the odor will be eliminated in almost all cases. If odor is strong, the sanitizing process may need to be performed a second time.
We recommend adding a tee to the incoming water line, in case a second round of peroxide is needed. If not, water will need to be drained and anode rod will have to be removed every time peroxide is added.
See diagram below for example tee setup.

**If your valve is not listed below, please contact us for steps on manually regenerating**
Step 1: Press the "clock" button on far left of the faceplate to activate the screen.
Step 2: Press and hold the "Regen" button on far right of the faceplate, for at least 4 seconds.
Important: Make sure to regenerate one tank at a time. Wait until the regeneration process is complete before regenerating the next tank.

Step 1: Press and hold the two triangle buttons ▲▼ at the same time for at least 4 seconds.
Important: Make sure to regenerate one tank at a time. Wait until the regeneration process is complete before regenerating the next tank.

Step 1: Press and hold the "Regen" button on far right of the faceplate, for at least 4 seconds.
Important: Make sure to regenerate one tank at a time. Wait until the regeneration process is complete before regenerating the next tank.

Step 1: Press and hold the "Regen" button, second from the left on the faceplate, for at least 4 seconds.
Important: Make sure to regenerate one tank at a time. Wait until the regeneration process is complete before regenerating the next tank.